Difference between revisions of "Blender Model Export"
m |
m |
||
| Line 12: | Line 12: | ||
Pioneer units are meters. You can keep Blender's unit display at "None", but if you switch to "Metric", remember to keep the scale at 1. | Pioneer units are meters. You can keep Blender's unit display at "None", but if you switch to "Metric", remember to keep the scale at 1. | ||
| − | [[File:Units.png| | + | [[File:Units.png|Blender's unit configuration]] |
Blender's Coordinates are as follows: X is right, Y is forward and Z is up. This is a bit different from Pioneer where X is right, Y is up and Z is backwards. You can model in default coordinates as it is possible to change the axes when exporting. | Blender's Coordinates are as follows: X is right, Y is forward and Z is up. This is a bit different from Pioneer where X is right, Y is up and Z is backwards. You can model in default coordinates as it is possible to change the axes when exporting. | ||
| − | [[File:Coords.png Coordinates]] | + | [[File:Coords.png|Coordinates]] |
=== Levels of detail === | === Levels of detail === | ||
| Line 24: | Line 24: | ||
Pioneer supports four levels of detail, where LOD4 is the most detailed. LOD1 is also used as the '''collision mesh''', so it should be as simple as possible but encompass the whole model. | Pioneer supports four levels of detail, where LOD4 is the most detailed. LOD1 is also used as the '''collision mesh''', so it should be as simple as possible but encompass the whole model. | ||
| − | [[File:Lod.png Level of Detail]] | + | [[File:Lod.png|Level of Detail]] |
Here we have LOD1 overlapping LOD2. | Here we have LOD1 overlapping LOD2. | ||
| Line 32: | Line 32: | ||
You can only have one material and texture per mesh. If you need multiple materials, you need to split your model into smaller parts and export them separately. | You can only have one material and texture per mesh. If you need multiple materials, you need to split your model into smaller parts and export them separately. | ||
| − | [[File:Cockpit.png Separating the cockpit]] | + | [[File:Cockpit.png|Separating the cockpit]] |
Here we separate the cockpit area and export it as a new .obj so it can be given a shiny material. | Here we separate the cockpit area and export it as a new .obj so it can be given a shiny material. | ||
Revision as of 02:22, 18 September 2012
Here are some notes on using Blender to produce Pioneer content.
Contents
Modeling
Limitations
- There's no established polygon budget, but don't go crazy. It's more important to have detail levels set up correctly so you don't use a 10K mesh for something that's only visible as a dot.
- One texture per mesh. .png format. Size must be power of two (32x32, 64x64, 128x128...).
Units
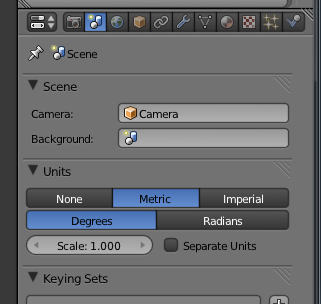
Pioneer units are meters. You can keep Blender's unit display at "None", but if you switch to "Metric", remember to keep the scale at 1.
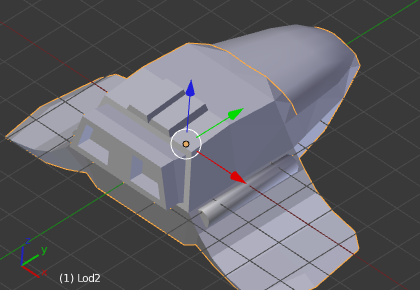
Blender's Coordinates are as follows: X is right, Y is forward and Z is up. This is a bit different from Pioneer where X is right, Y is up and Z is backwards. You can model in default coordinates as it is possible to change the axes when exporting.
Levels of detail
It is important to supply LODs for your model.
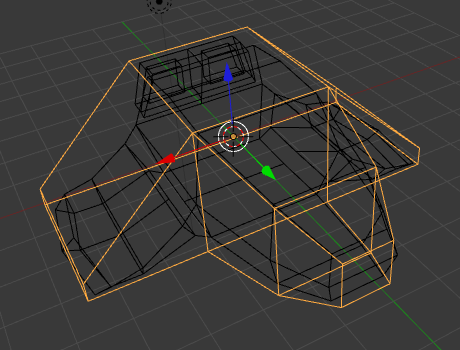
Pioneer supports four levels of detail, where LOD4 is the most detailed. LOD1 is also used as the collision mesh, so it should be as simple as possible but encompass the whole model.
Here we have LOD1 overlapping LOD2.
Multiple materials
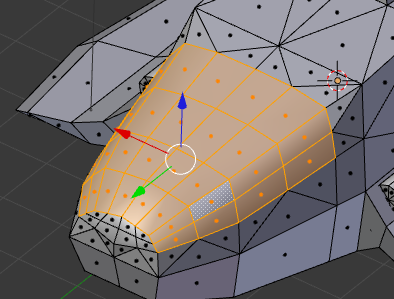
You can only have one material and texture per mesh. If you need multiple materials, you need to split your model into smaller parts and export them separately.
Here we separate the cockpit area and export it as a new .obj so it can be given a shiny material.
Exporting
Select .obj file format when exporting and use the following settings (remember to save the preset).
File:Export-settings.png .OBJ Export settings
If you don't export normals, Pioneer will recalculate them and smoothing information will be lost.
Using the models
Here is an example ship definition. First we define a "gear" model which can be called and animated as a landing gear submodel.
define_model('gear', {
    info = {
        scale = 1.0,
        bounding_radius = 5,
        lod_pixels = {100},
        materials = {'default'},
    },
    static = function(lod)
        set_material('default', 0.8,0.8,0.8,1, .3,.3,.3,5, 0,0,0)
        use_material('default')
        texture('gear_diff.png')
        load_obj('gear.obj')
    end
})

define_model('natrix', {
    info = {
        scale = 3.5,
        bounding_radius = 40,
        lod_pixels = {50, 100},
        materials = {'default'},
        tags = {'ship'},
        ship_defs = {
            {
                name='Natrix',
                forward_thrust = -6e6,
                reverse_thrust = 0,
                up_thrust = 1e6,
                down_thrust = -1e6,
                left_thrust = -1e6,
                right_thrust = 1e6,
                angular_thrust = 15e6,
                gun_mounts = {
                    { v(0.000, 0.000, -9.342), v(0.000, 0.000, -1.000) },
                },
                max_cargo = 50,
                max_laser = 1,
                max_missile = 0,
                max_cargoscoop = 0,
                max_fuelscoop = 0,
                capacity = 40,
                hull_mass = 30,
                price = 50000,
                hyperdrive_class = 2,
            }
        }
    },
    static = function(lod)
        --name, diffuse rgba, spec rgb+intensity, emit rgb
        set_material('default', 0.8,0.8,0.8,1, .3,.3,.3,5, 0,0,0)
        use_material('default')
        texture('hull.png')
        texture_glow('emit.png')
        if lod == 1 then
            load_obj('lod1.obj')
        else
            load_obj('lod2.obj')
        end

        --rear facing thrusters
        thruster(v(1.300, 0.000, 9.769), v(0.000, 0.000, 1.000), 4.50, true)
        thruster(v(-1.300, 0.000, 9.769), v(0.000, 0.000, 1.000), 4.50, true)

    end,
    dynamic = function(lod)
        --no point in visible gear on lowest lod
        if lod > 1 then
            --gear animation. In Blender we have determined that the gear
            --should be translated 0.5 units downwards.
            local gearpos = get_animation_position('WHEEL_STATE')
            call_model('gear', v(0,-0.5 * gearpos,0), v(1,0,0), v(0,1,0), 1.0)
        end

        --script blinking lights, dynamic equipment submodels etc. here
    end
})


