Difference between revisions of "Manual"
m (→Flight UI: Bit of update indicating that parts are outdated) |
(→Orbital map (F6)) |
||
| Line 174: | Line 174: | ||
*'''Targeting''': Any body can be targeted by holding '''Shift''' while selecting the body. | *'''Targeting''': Any body can be targeted by holding '''Shift''' while selecting the body. | ||
*'''Translation''':The view is always centered on the body selected. You can't move the view. | *'''Translation''':The view is always centered on the body selected. You can't move the view. | ||
| − | *'''Rotation''': You can | + | *'''Rotation''': You can rotate either by holding the '''Middle mouse button''', or by using Left Mouse Button on the rotation icon |
*'''Zoom''': You can use the '''Mouse Wheel''' or the buttons on the top right for zooming. Shift accelerates zoom similar to the sector view. | *'''Zoom''': You can use the '''Mouse Wheel''' or the buttons on the top right for zooming. Shift accelerates zoom similar to the sector view. | ||
*'''Time controls''': You can use these buttons to check the position of the bodies in the system (including your ship) in any given time. The button in the center resets it to the current time. This is useful for planning a flight. The set time is shown above the current time on the left. | *'''Time controls''': You can use these buttons to check the position of the bodies in the system (including your ship) in any given time. The button in the center resets it to the current time. This is useful for planning a flight. The set time is shown above the current time on the left. | ||
Revision as of 13:16, 10 December 2021
Pioneer is a space adventure game set in the Milky-way galaxy at the turn of the 31st century. The game is open-ended, and you are free to explore the millions of star systems in the game. You can land on planets, slingshot past gas giants, and burn yourself to a crisp flying between binary star systems.
This reference manual provides a brief overview of the game.
- Quick Load: Loads the game you saved using quick save (ctrl+F9)
- Start at Earth: You start the game in the Solar system, on Earth, at London Spaceport with an outfitted Sinonatrix. It can be considered an easy start. Sol is the capital of the Solar Federation
- Start at New Hope: You start in Epsilon Eridani, the capital of the Commonwealth of Independend Worlds. Your Pumpkinseed stands on Itzalean Spaceport on New Hope. This is a bit more difficult starting point than Earth. Itzalean is in an area of frequent solar eclipses.
- Start at Barnard's Star: You start on the dock of High Security Prison Tranquility, orbiting Barnard's Star, not far from Sol. You have a poorly outfitted Xylophis, so you can consider it a difficult start.
- Load Game: You can load previously saved games here. Saves created with older versions of Pioneer might not load. This usually happens when some major thing changes in the game.
- Options: you can access Pioneer's Settings Menu. You can set up graphics, controls, volumes or language for example.
- Quit: Exit the game.
- Build: this number is the build of the game you are running. Basically a version number, useful for reporting bugs for example.
Flight
Flight physics in Pioneer is Newtonian, which means there's no arbitrary limit to speed, orientation or position. The ships don't slow down in space, until it actively thrusts in the opposite direction it's flying. Or hits something. Ship acceleration depends on ship mass and engine thrust. Speed only have a meaning relative to something, so you have to pick a point of reference. This is automatic, based on the distance to the bodies. You can reach very high speeds compared to what we are used to here on the face of a planet. On the magnitude of thousands of km/s.
There's an aided flight mode which compensates for the drifting in the vacuum of space, called Set Speed mode. It tries to maintain a set speed to the direction the ship is facing, using the maneuvering thrusters. The performance of this aid varies ship to ship, and the cargo load could also have an impact on it.
Ships in the game are quite powerful in terms of acceleration, cargo and delta-v capacity compared to real spacecrafts. It's entirely possible to travel to the edge of a star system even with the smallest shuttle. It will just take significantly more time.
Gravity is simulated on a two-body level. You can orbit any planet or moon, but only the closest body's gravity affects your ship. This is the same body you measure your speed to. This also means that you have to take the planets gravity into account when you are flying close to it, landing, or taking off. You can also use this to your advantage to alter your course using less fuel for example. Distances are realistic, so space travel can take several days or even weeks in a large system. Time could be accelerated up to 10000 times to shorten travel for the player. This doesn't correspond with any device or technology in the game universe though. It's just a UI/Gameplay feature.
Flight UI
Beginners are strongly recommended a look at the Basic flight article, to learn how to control the ship.
When you pick your starting point, you will get behind the controls of your ship.
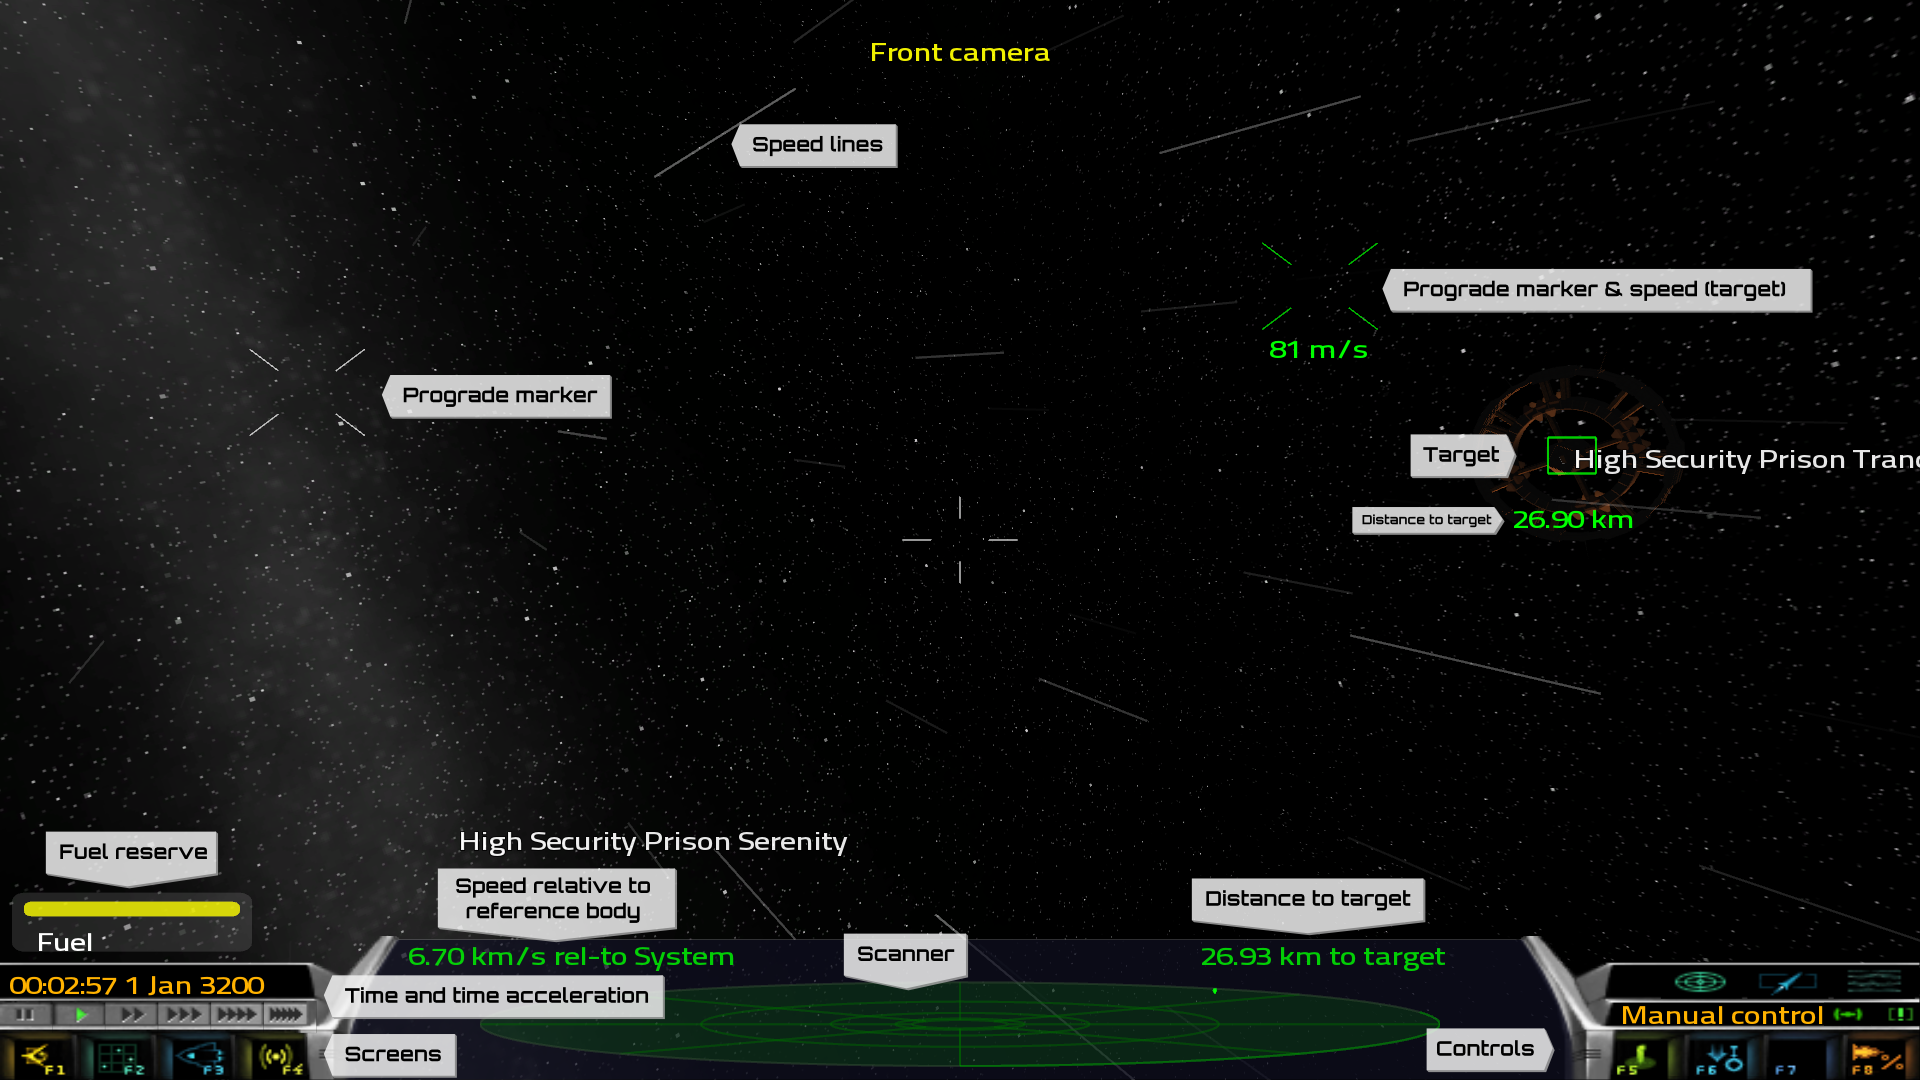
There are several things on the flight UI:
- Prograde marker: The direction you are flying relative to the point of reference,
- Speed relative to reference body: The speed of the ship relative to the point of reference ("System" in this example).
- Prograde marker & speed (target): Direction and speed of the ship relative to the target (which itself moves around a star for example)
- Heading: Only shown, top centre of screen, when close to planet (not shown in screen shot here). Can switch reference system by clicking it to be either in planetary coordinates, heading 0 = north, 90 = east, 180 = south, 270 = west; or in system-wide coordinates, heading is on the celestial sphere (defined by the ecliptic)
- Pitch: Only shown, at right centre of screen, when close to planet (not shown in screen shot here). Shows elevation of ship direction over horizon.
- Target: The navigation target, selectable by using the Left Mouse Button. You can set any body or ship as the point of reference with Ctrl+Left Mouse
- Distance to target: Shows the distance to the selected object. The unit is km for shorter distances and AU for large.
- Speed lines: A visual aid showing the direction and speed of motion.
- Fuel reserve: The % amount of fuel (propellant really) the tanks contain. You can refill it during flight using the Info View screen (F3). Spaceports do not refil your tanks automatically, but you can do it on the station lobby. Note that it only shows %, but your actual deltaV can be more since you continuously expel propellant, so your craft becomes lighter.
- Scanner: Scanner display which shows nearby contacts. Only works if the ship has a Scanner equipped. This area also shows any messages you receive, like completion or failure of a mission for example.
- Dashboard:
Note: Parts of this section are outdated because of the ongoing UI rewrite.
- Date, Time and time acceleration controls:

- Shows the current date and time.
- The Pause, Play, and Fast Forward buttons can be used to speed up time to shorten long trips. Or to wait for better missions or ships on a station. Maximum level of time acceleration might be restricted, especially in the vicinity of stations or planets.
- This restriction could be overridden by holding ctrl when activating it. Use this with caution, because it could easily wreck your ship.
- Screens:

- These buttons provide access to certain screens like Info View or Maps. You can also use the corresponding F-keys to access them. From left to right:
- View (F1): Switches between internal and external views. You can switch back to these views from any other screen using this button or key.
- Maps (F2): Sector and System Map and System information screens. You can plan your trip here.
- Info (F3): Information screens, about the ship, the player, missions, cargo and crew.
- Comms, Station screen (F4): Opens Station Screen while docked to a spaceport.
- There are six attitude (ship facing) options meant for orbital operations:
- Prograde/retrograde: faces the ship in/opposite the direction that you are traveling (changes the height of the orbit)
- Normal/anti-normal: faces the ship in the direction [anti-]normal to your orbital plane (changes the orbit inclination)
- Radially in/radially out: faces the ship toward/away from the orbited body
- If the ship has an autopilot installed, there are also options for automatically flying the ship into a low/medium/high orbit, flying to the vicinity of the navigation target, and flying to the navigation target and docking.
- There are six attitude (ship facing) options meant for orbital operations:
- Controls:

- These are flight related controls, corresponding F-keys could be used also.
- Flight Mode (F5): Switches between Set Speed and Manual flight mode.
Also switches off the autopilot or could be used to undock or take off. - Landing gear (F6): Rises or lowers the landing gear (undercarriage).
- Hyperdrive (F7): Engages hyperdrive. Needs a reachable hyperspace target selected on the Sector Map, and enough fuel for the trip. If it is crossed out, then you are in the hyperperspace limit zone, and jumping is illegal. You need to fly far enough from the station, or the police will chase you down.
- Low Thrust (F8): Sets the percentage of low thrust (Thrusting while holding Left Shift)
- It also displays the desired speed in Set Speed flight mode. On this image it shows the flight mode, which is set to manual.
- The small circular button next to the flight mode display show the status of the rotation damping.
- The [!] next to the rotation damping indicator shows your alert status.

These are controls for Scanner mode, Missiles and equipment (ECM) and Messages respectively.
- Date, Time and time acceleration controls:
Combat
Combat in Pioneer is quite straightforward right now. You can buy Pulse cannons or Plasma accelerators of different power and fire rate, if your ship has mount for them. Some ships have a rear mount too. Cannons generate heat when fired, and they need some time to cool down. They can not be fired if they are overheating.
You can also buy several types of missiles, which can be fired using the M key, if you have a combat target. An ECM can provide protection against missiles by overloading their guidance.
You can target any ship as combat target, using your Left Mouse Button(which doesn't change the Navigation target). The ship's computer displays the speed of the ship relative to your vessel, and it's distance. There's also a lead indicator, a little cross which shows the predicted location of the target. This is the spot where the ship will be in theory based on it's speed and direction, when the projectiles reach that distance. It's harder than that though, since no sane enemy will fly in a straight line at a constant speed. You shouldn't do that either, and this is where your maneuvering thrusters can be very useful.
Ship durability is determined by it's hull's mass. Lighter ships can take less damage, but they are more maneuverable generally, then a behemoth transport, which might withstand sever punishing before giving in. You can repair any damage you suffer on spaceports, but it will cost you.
There are several additional equipment that can increase your chances in a firefight (and make your life harder if your opponent has them):
- ECM: Electronic countermeasure against missiles. The Advanced ECM provides protection against more sophisticated missiles.
- Hull Auto-repair system: As the name implies, it slowly repairs any damage your ship took. It weights 40t, so smaller ships can not have it.
- Hypercloud Analyzer: You can get readings from a hyperspace cloud remnant, like destination and arrival date. It's useful if you need to follow somebody.
- Laser Cooling Booster: Speeds up the cooling of cannons, so continuous firing can be maintained longer.
- Scanner: A sensor system that shows the ships and objects around you. A form of radar basically.
- Radar Mapper: Provides additional information about the combat target, like the type of ship, mass, condition among others.
- Shield Generator: Projects a protective screen around your ship, which can take a certain amount of damage before collapsing. It recharges slowly over time. You can mount several Shield Generator to increase its power.
- Shield Energy Booster: Increases the effectiveness of the shields.
Flight controls
A brief summary of flight controls. A more detailed list can be found at Keyboard and mouse controls.
- Orientation:
- W, S: Pitch
- A, D: Yaw
- Q, E: Roll
- P: Kill rotation
- R: toggle rotation damping
- Right mouse button: hold to activate mouse control
- Movement:
- I, K: Forward and backward thrust
- J, L: Side thrust
- U, O: Up and down thrust
- Left Shift: use lower thrust
- F8 : Set low thrust percentage
- F5: change flight mode, or undock, takeoff
- Manual flight: everything is manual
- Set Speed Mode: the ship tries to maintain the set speed in the direction the ship is looking. Using the thrusters override it temporarily
- Return: Increase speed
- Right Shift: Decrease speed
- F6: toggle landing gear
- F7: Engage hyperdrive
- Weapons:
- Space: Fire cannon
- M: Fire missile
- View:
- F1: Cycles trough internal, external and sideral views. External rotates with your ship, sideral doesn't.
- Numpad 2 4 6 8 and 1 3: Rotate the the external views.
- Numapad + -: Zoom external views.
- Numpad /: Reset view.
- Internal views:
- 8 2: Front and rear view. You can shot backwards in rear view if you have a weapon installed on that mount.
- 4 6: Left and right view.
- 9 3: Top and bottom view.
Map (F2)
This is where navigation takes place. You can open the Map view with the F2 key or the button on the dashboard.
There are several maps you can use.
You can reach them by using their F-key, or the button on the right side of the dashboard. If you come back to the map view you will return to the map screen you were at when you switched to another view. Orbital Map and System info shows the information of the system which is selected on the Sector map.
Sector Map (F5)
The sector map shows the star systems in the galaxy, and you can plot your hyperspace route here, or you can just hunt for interesting systems for later visits. Every system is indicated by a sphere. Its colour indicates the primary star type. You can select a system by clicking on it. If it's a system with multiple stars, you can cycle trough them by clicking on the system again, or you can select it on the System Info screen.
The map is divided to 8 light year cubes called sectors. Each sector has a coordinate on each axis; the origin (0,0,0) is Sol. The galaxy is not a flat disk, you can travel quite far on all three axes before you reach the edge of it. Map view UI:
- Current system: The system you are currently in, with sector coordinates and a brief info about it. The button next to it centers the view on it.
- Hyperspace target: The system selected as hyperspace target. Shows the coordinates, distance, fuel and travel time needed to reach it, and a brief info about it. It can be locked with Space bar, that way it stays as target even if another system is selected.
- Selected system: Shows the same info as Hyperspace target if that's not locked. If locked, it shows the same info for the selected system. Useful for system comparison or travel planning.
- Map view settings:
- Draw vertical lines: draws a vertical line from the stars in range to the plane of the map to show the height relative to that plane. Clarifies system positions a bit.
- Label out-of-range systems: Toggles label display for systems that are out of range. The map only shows labels for systems in range by default, so it's a useful option if you look for a specific system for example.
- Label uninhabited systems: Toggles label display for systems that are uninhabited (no settlements, spaceports).
- Hyperspace range: the map draws a transparent sphere to show which systems are in jump range. Jump range depends on hyperdrive class, fuel on board and the total mass of the ship.
- View position: On the lower left corner, distance and coordinate data are displayed regarding to the current view.
Map controls:
- Translation: You can move around on the sector map using the arrow keys and Page Up and Page Down for vertical (forward/backward) movement. Movement is based on the view rotation.
- Rotation: The view can be rotated with the W A S D keys, or with holding the Right Mouse button.
- Zoom: You can zoom with the + and - keys, or with the Mouse wheel, or using the two buttons on the top right.
- Faster controls: Holding Shift speeds up movement and zoom. Use Right Shift for smaller speedup and Left Shift for quite fast movement.
- Selecting system: Moving around on the map will automatically select the system closest to the center of the view. You can also select any system with the mouse.
- Selecting another star In a system with multiple stars (Binary or tertiary systems), you can cycle trough each star by clicking on the system again until you find the one you want to travel to.
- Lock selection: You can lock your selection as the hyperspace target with the Space bar. This allows for selecting another system to plan a route, or could be useful for comparing systems.
- Center: Pressing C centers the view on the system you are in. G centers on Selected system and H centers on the Hyperspace target.
- Reset view: R resets view rotation, and zoom.
- Search: You can type in the name of the system to the Search field on the lower right and it will select the system if it can be found. Note that it doesn't search the entire galaxy, only in a few tens of sectors range. You can also enter coordinates to move the map to any area.
- Tab: Switches the left side info panel to faction filter.
Zooming out far
Zooming out far switches to an overview that only shows color-coded dots for systems based on faction, and brings up the faction filter to the right where you can hide any faction. Map controls are the same as before.
Orbital map (F6)
You can switch to the Orbital map using F6. It shows the to-scale orbital map of the star system selected on the Sector map. It is useful for in-system navigation. It shows your current position and your course of movement, and the orbit of every body (star, planet, moon, space-station) in the system.
Controls: Controls of the orbital map are a bit different from the Sector map.
- Selection: You can select any orbital body using your Left Mouse button.
- Targeting: Any body can be targeted by holding Shift while selecting the body.
- Translation:The view is always centered on the body selected. You can't move the view.
- Rotation: You can rotate either by holding the Middle mouse button, or by using Left Mouse Button on the rotation icon
- Zoom: You can use the Mouse Wheel or the buttons on the top right for zooming. Shift accelerates zoom similar to the sector view.
- Time controls: You can use these buttons to check the position of the bodies in the system (including your ship) in any given time. The button in the center resets it to the current time. This is useful for planning a flight. The set time is shown above the current time on the left.
The Orbital Map shows your position and course in the system, relative to your reference body, be it a stable orbit or an escape trajectory. You can use this to fine-tune your path while you are traveling to your destination for example. Or you can just check if you managed to achieve a stable orbit.
Time controls work on this too, you can check where you will be at any given time. Note that this course display might change when you switch reference bodies, for instance when you get close to a planet.
System info (F7)
This screen shows detailed info on the system. If the system has multiple stars, you can select which one you want to be the hyperspace destination, by clicking on it.
F7 switches between these views:
- Planetary info: Shows a general system description. Hovering over any body with the mouse displays more detailed information, like orbital parameters, temperature, atmosphere composition. It also shows the star-ports on the surface of the body. Bodies that have settlement are circled for easier spotting. In systems with multiple stars, the one currently selected as hyper jump target is indicated with a square centered on it.
- Economics info: Shows exports, imports of the system, and the illegal goods. Exported items are cheap, imported items are expensive, so this is a crucial screen for trading. Illegal goods can only be bought or sold at black market retailers found on the star-port BBS. Be careful though, some retailers are undercover cops who will fine you if you attempt to make business with them. Illegal items are based on factions. If you have selected a system other than the one you are currently in, it will compare imports/exports between them and mark commodities of special interest with Green (best, e.g. major export in system A is a major import in B), or white (Major/Minor export in A is a Minor/Major import in B). For Illegal goods only gray or red is used to show if it is legal in one of the systems but illegal in the other.
- Demographics: Shows information on the system, like population, government type and faction.
Galaxy map (F8)
The galaxy map shows an overview of the whole galaxy, highlighting your current position. Brighter areas generally have more stars than darker areas.
Info View (F3)
You can access various information by pressing F3, or the Info View button on the dashboard.
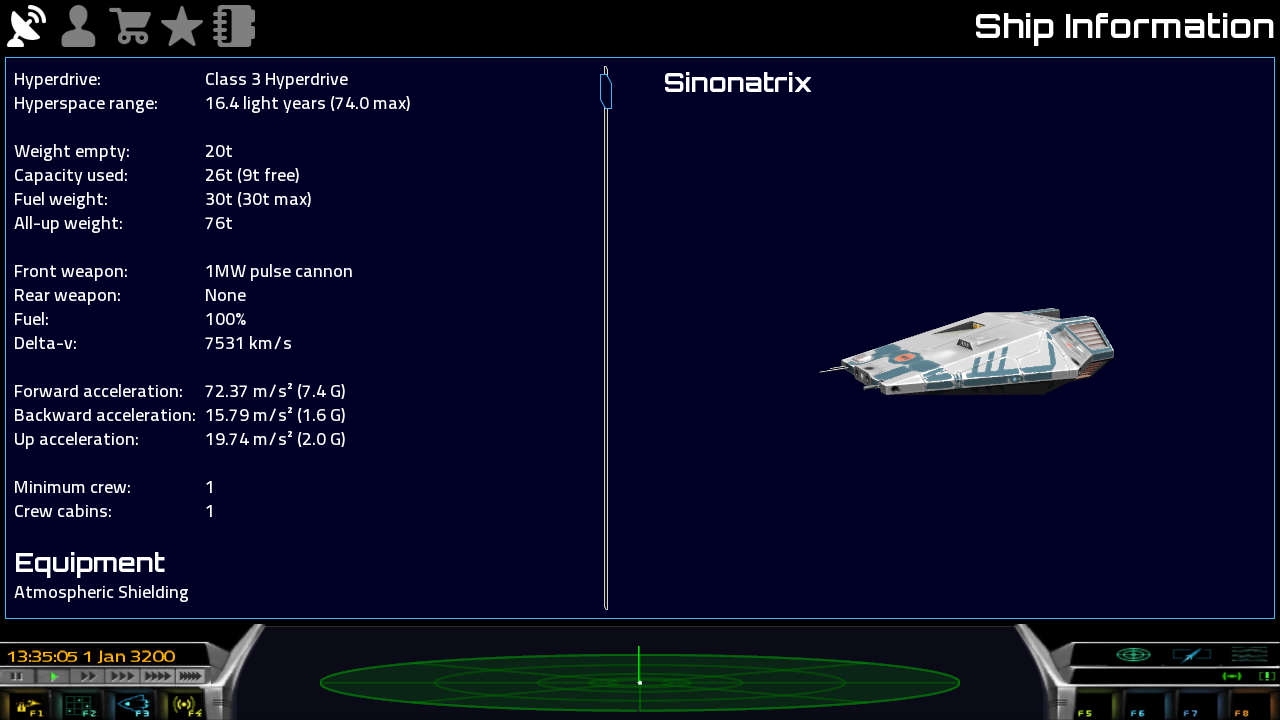
Ship Information
Shows information regarding your spaceship
- Hyperdrive & Hyperspace range
The class of hyperdrive installed on the ship. Higher class hyperdrives are heavier, but can jump to greater distances. Common hyperdrives consume Hydrogen, which can be bought on stations, or could be scooped from the atmosphere of gas giants, if the ship has a Fuel Scoop installed.
Military Drives are generally faster, but they use Military fuel, which is more expensive and harder to obtain. Military drives turn fuel into Radioactives that you need to get rid of.
Current Hyperspace range is displayed based on current ship mass and the amount of fuel in the cargo hold. You can see the theoretical maximum range shown in brackets. This changes as you fill your ship with cargo or fuel.
- Mass data
- Weight empty: Dry mass of the ship, without any cargo or propellant.
- Capacity used: Used and available cargo and equipment capacity of the ship.
- Fuel weight: Amount of propellant, and the maximum capacity of the tanks. Propellant is Hydrogen. Tanks are refilled upon docking or landing on a station, if the player has enough money ($1-6 usually). It's possible to buy extra Hydrogen in the Commodity Market for manual in-flight refill.
- All-up weight: Sum of hull, cargo and propellant mass.
- Weapons
Cannons installed on front and rear facing hard-point.
- Fuel & Delta-v
Propellant and delta-v reserves. Delta-v shows, how much speed change can be done using the propellant in the tanks. Generally, more delta-v means faster in-system travel.
For a brachistochrone transfer (accelerating halfway, then decelerating) you can use up half of the delta-v. If you exceed that, then you will be unable to stop your ship. It's useful to save a good amount of delta-v (about 500-1000 km/s) for course corrections and landing.
Delta-v display doesn't take additional Hydrogen in the cargo hold into account, so refueling with Hydrogen can increase it. Ship mass can also change delta-v capability dramatically.
You can scoop Hydrogen from the atmosphere of a gas giant, if you have Fuel Scoop installed.
You can mine water in the field, if you have a Mining Blaster and Cargo scoop. You need to find a planet that has water (a smaller moon or dwarf planet is easier to mine), shoot the surface and collect any water that's blasted out from it.
- Accelerations
Shows the acceleration the ship is capable of with it's current load. Displayed both in m/s^2 and Gee. A ship with higher acceleration will feel faster, especially around station. It affects travel times less then delta-v.
If Up acceleration is higher then the gravity of the planet, then the ship might not be able to take off or land, especially using the autopilot.
Acceleration increases while the ship uses its propellant, and can be further increased by jettisoning cargo. Selling cargo or equipment can help too.
- Crew
Minimum crew shows the needed head count to fly the ship (currently ignored). Crew cabin shows the crew capacity of the craft. Crew are useful in multiple ways, but you have to pay them weekly.
Crew can control the ship, engage the enemy or repair damages. Each crew member has strengths and weaknesses, their abilities improve by time.
- Equipment
Shows the list of installed equipment. These equipments enhance your ship's capabilities, and can even add functions to it.
Personal Information
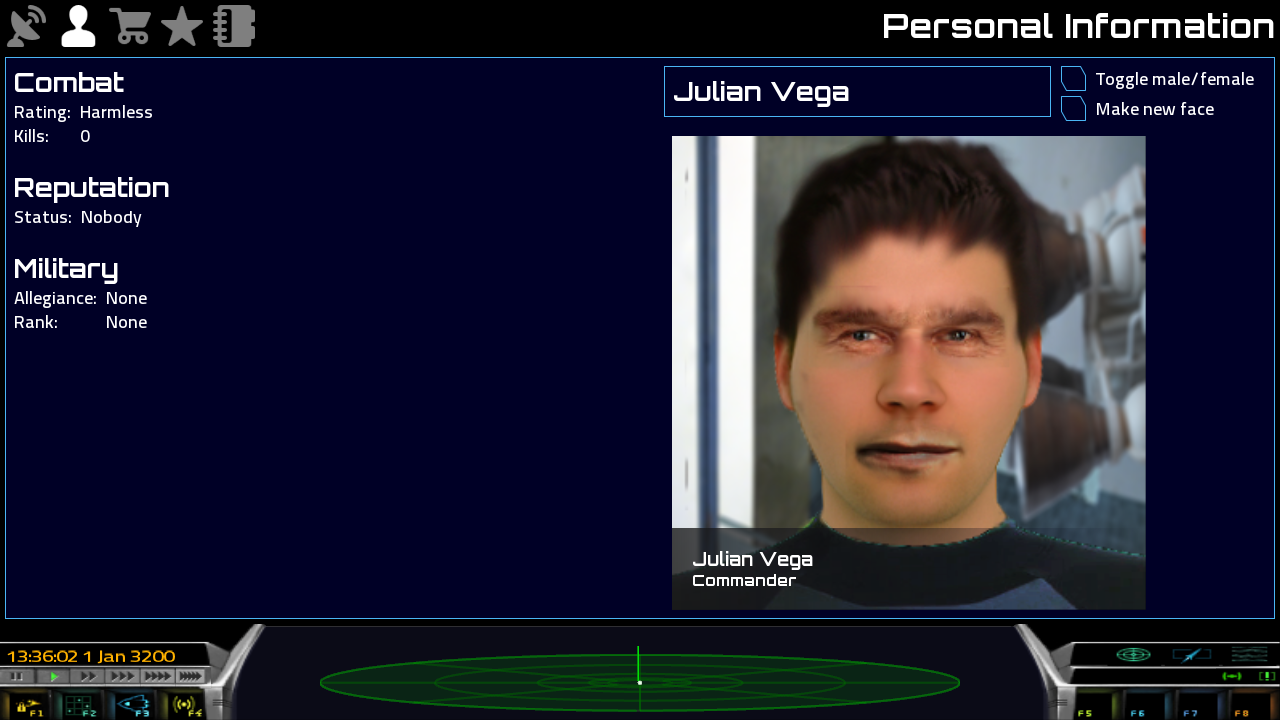
Shows information about your character. Currently you see your combat rating, reputation standing, and rank (however, the rank can not be changed in the game yet, and doesn't influence the game either).
Reputation affects mission availability, and can be increased by completing missions or donating to charities. Failed missions decrease your reputation.
You can also change your name, gender and face.
Economy & Trade
Shows the contents of the cargo hold in detail, and allows in-flight refueling. You can find the list of cargo in your hold, and you can jettison any of them here while in flight. If you have Cargo Scoop installed, you can even retrieve the jettisoned cargo.
Refueling transfers 1t of Hydrogen, if available, to the propellant tanks. Available and occupied passenger cabin space can be checked here too.
Missions
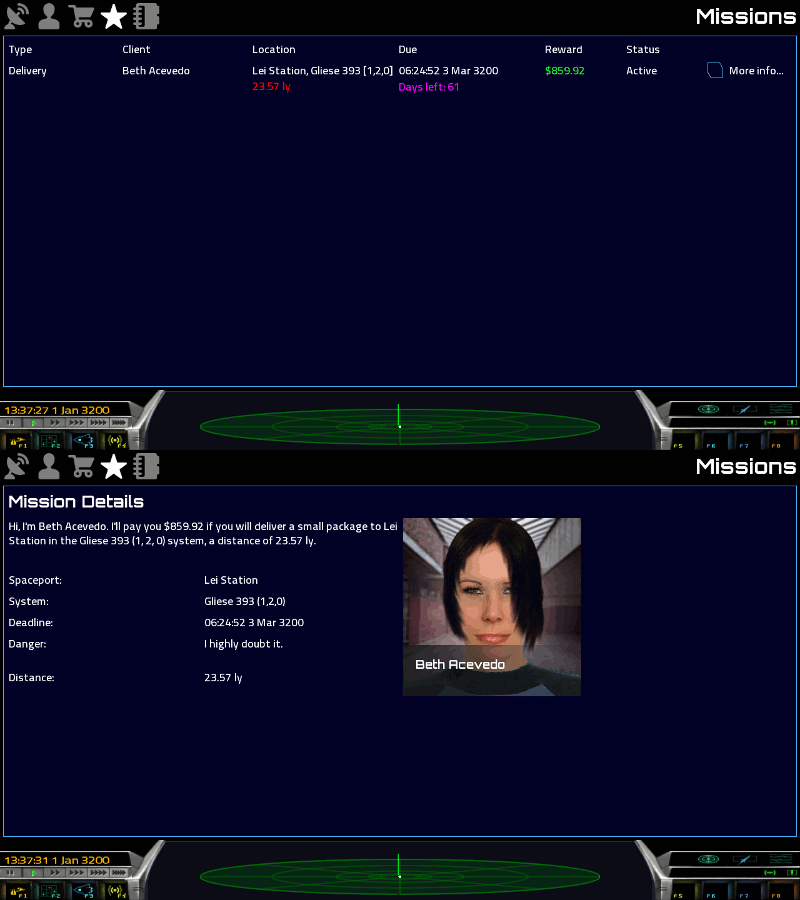
Shows information about accepted missions. You can check the destination and deadline here, and you can see additional information about each mission, using the More info... button on the right.
You can find and take all kinds of missions on any star-port's BBS, but be sure to check if you and your ship is capable of completing it. Failing missions decrease your reputation, which makes it harder to find lucrative offers, so it will be harder to regain your reputation, so be cautious.
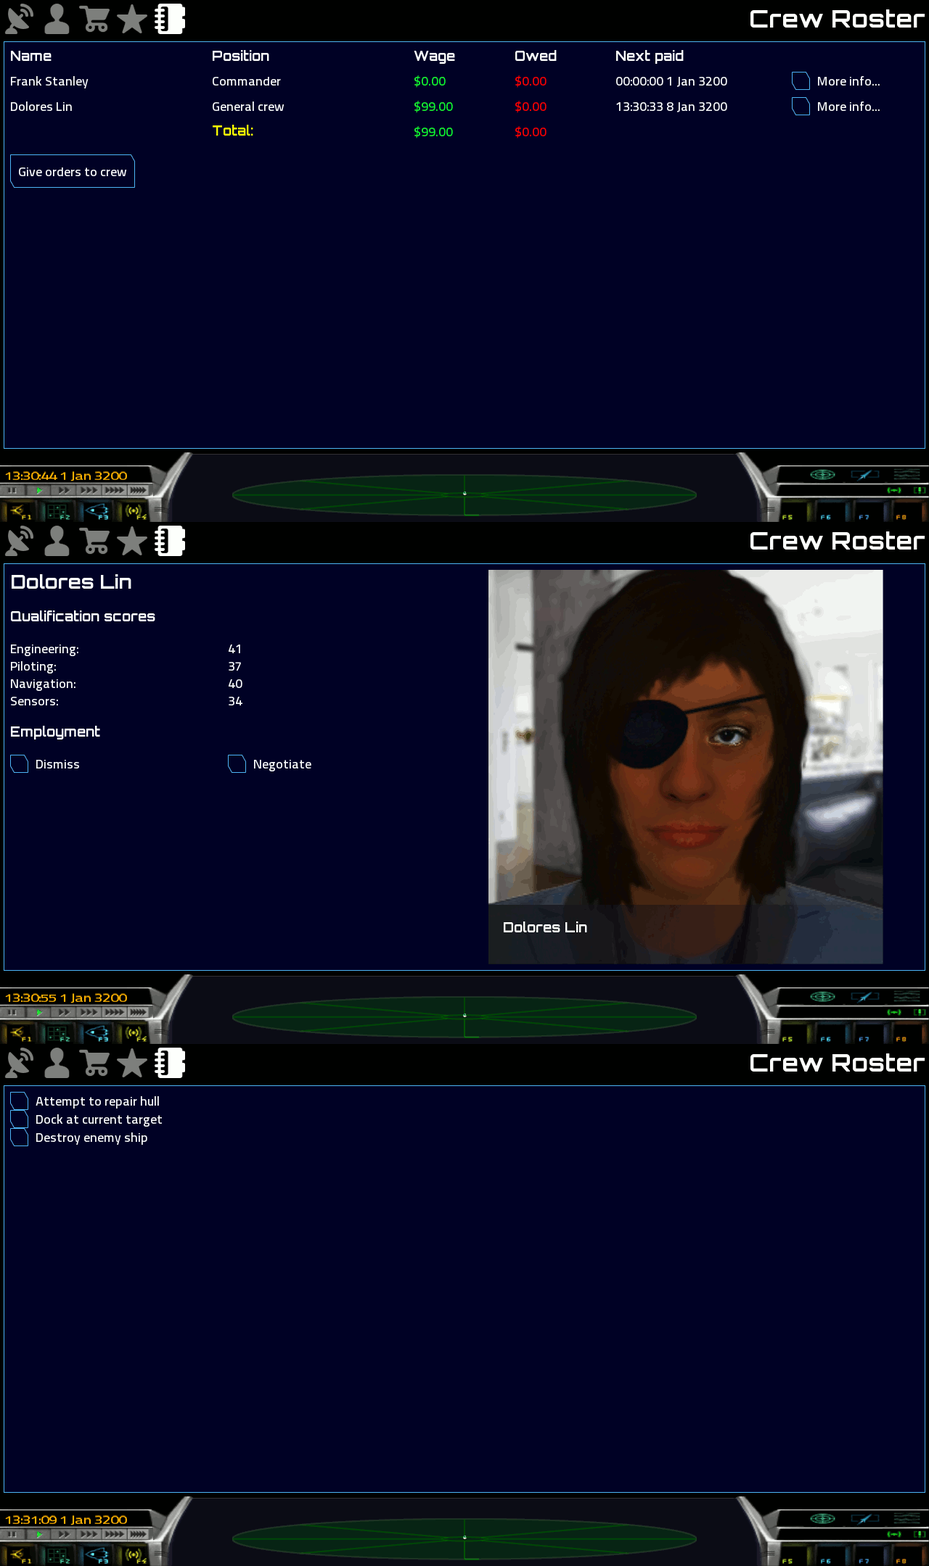
Crew Roster
You can access information about your crew. It shows the salary which you need to pay them weekly. If you can't pay for a while, they will get off on the next port, with some of your reputation.
Some ships need multiple crew members on board even to fly it (this is ignored right now though), and they can perform several tasks, like piloting, engaging in combat or repairing the hull or failed equipment.
Station view (F4)
Access this screen with F4 or the comms icon on the dash board, while you are docked to a space-port, be it a surface base or an orbital station. All screens show the cargo and passenger capacity of your ship, your money and legal status in the footer.
Lobby
It's a good idea to request launching clearance before taking off. The station dispatcher will stare at you until you get embarrassed and go about your business.
Bulletin Board
You will find missions of all sorts here on the BBS. Keep in mind that some might not be suited for your ship in terms of distance and deadline. Some missions are in-system, and will not require any hyperdrive, but will in turn pay less. You should check the system map even in this case, because planets might be in opposition on their courses and you end up traveling across the whole system which can take a while even with a high delta-v ship.
Some missions are riskier, so it's always a good idea to ask if there will be any danger, so you can prepare properly, or avoid the mission altogether until you are better rigged for combat for example.
Local hyperdrive maintenance companies offer their services here too. Old drives may start to misbehave, so if you don't want to strand yourself in the interstellar void, don't forget regular maintenance.
Charities can also turn up from time to time, asking for money for their cases. Donating to them could increase your reputation.
When you start a new game, you will not have any reputation, which must be earned by taking on missions (or donating to charities). You can see your current reputation standing in your personal Info view. Reputation affects what kind of missions you can take on. Completing a mission will increase your reputation, and opens up more job opportunities, and failure decreases it, narrowing the available mission after a while.
Some stations have private black market goods dealers who trade in illegal goods, although some might be undercover police.
You can also hire new crew members if you are in need. Make sure to have good candidates on the BBS before buying a new ship. You can make them sit a test to show their abilities (though those doesn't affect the game right now), and you can negotiate their pay too.
If no mission suits you, then something new might pop up over time. Missions that require better reputation are grayed out, and the advertiser won't talk with you much.
Commodity Market
You can buy and sell commodities here. Keep in mind, that a heavy ship will have shorter hyperspace range. You can also buy Hydrogen or Military fuel for your hyperdrive here. You just need to click on the name of the commodity on the left side to buy 1t of it. The contents of your cargo hold are on the right side, clicking on any item will sell 1t of it. Buy and sell prices are the same right now.
Prices depend on the type of the system. Agricultural systems will pay a lot for farm machinery for example, and you can buy cheap foodstuff. An industrial system on the other hand sells cheap machinery, and pays good money for food. You need to scout out lucrative routes for yourself if you want to turn profit.
Illegal goods can't be found on the market, you need to look for a black market retailer on the BBS. Note that one item can be completely legal in one system, but illegal in another.
Shipyard
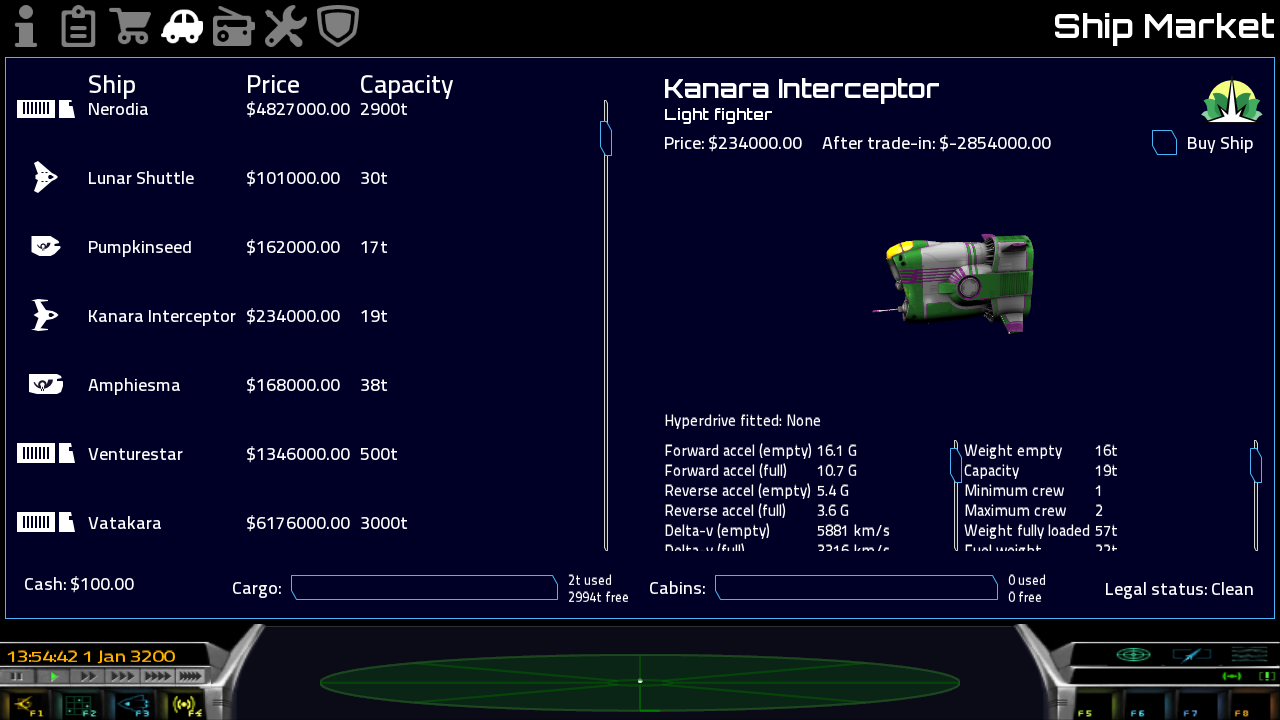
You can buy ships here, trading in your current ship with all of its additional equipment or cargo. You can check out the capabilities and stats of the ships offered for purchase, much like the information you have on the Info view screen. The After Trade-in is the final price you need to pay, and if it's negative, it means your current ship worths more then the one you are looking at. Trade-in value is about the half of the list value of any ship.
Ships are traded continuously, so you just need to wait a few hours if there's nothing interesting there, and new vessels will turn up.
Equipment Market
Buy/sell equipment for your ship. Equipment market works similar to the commodities market. Left side shows what's available on the station, right side shows, what's installed on your ship. Each equipment has a certain mass, so they occupy space on the ship much like cargo. heavier ships are harder to maneuver, and their delta-v and hyperspace range also decreases. You can't remove any equipment while you are flying, except for using missiles. Equipments add extra capabilities to your ship, like radar and targeting information, autopilot, cargo and fuel scooping ability. You can buy weapons, shields and some upgrades to these too.
Ship Repairs
Maintaining your ship is important, unless you want to be stranded in an uninhabited system or interstellar space due yo your hyperdrive failing. You can repair your hull here too, if needed.
Police
If you have any fines you need to pay them or else risk getting shot down by some restless police officer. You can get in trouble for trading with illegal goods, or even if you accidentally fire your weapon near any settlement. In the later case it's better to run, then pay the fine later.

