Basic flight
Space flight could feel quite different for someone who was born on a planet and used to driving a car or piloting aircraft. But it can be learned nevertheless. To make our life easier, let's choose Barnard's Star from the main menu as our starting point. We will be on a prison space station orbiting the red dwarf called Barnard's star, which is quite close to Sol actually so we can do more complex exercise later in a more familiar place. The ship you get is a tiny shuttle called Xylophis. It's not a flashy craft, but it's more than enough to start learning to get around in the vacuum of space. This tutorial assumes that you are using the default controls.
Contents
Undocking and first steps
We could go trough the controls and HUD of the spacecraft first, but let's just make things more interesting by going head first and undock. You can do that by pressing [F5] on your keyboard, or the first button on the bottom right of the control panel (which cycles flight mode during flight). You have to wait for a few seconds, and your ship will leave the station automatically. The ship will start to thrust away from the station, but we don't want to get too far from it for now, so let's stop. Press [F5] until it says Set speed on the bottom right, then hold [Right Shift] or [g] until the counter reaches 0. Note that if you release and hold again [Right Shift] at this point, you will set a speed in reverse. (and then you can bring the speed back to 0 by holding [Enter] or [t].
Retract your landing gear with [F6]
This Set Speed mode tries to maintain the given speed in the direction you are facing, which can be quite helpful if you are used to flying in the atmosphere. We set it to 0, to stop the ship relative to the station.
HUD and Dashboard
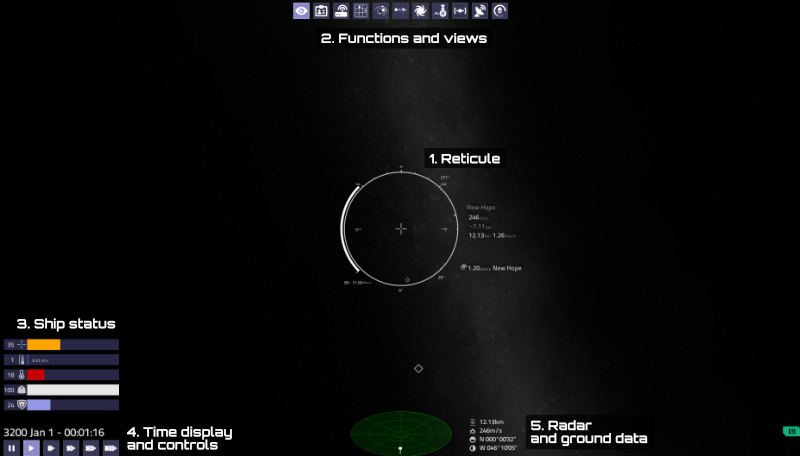
Let's just skim trough the HUD and control panel, before doing anything else:
- The buttons on the bottom left are for different interfaces, such as Maps and Ship Info. You can learn more about them in the Manual
- You can cycle trough Internal and external views using [F1]
- You can manipulate these views using the Numpad keys.
- You have an internal view for each direction, also accessible trough the NumPad keys.
- The buttons on the bottom right are to control ship functions. Above them is a display that shows current control mode (Set Speed on this example).
- In the center you can see the scanner display, and your current speed and the Object of reference.
- The speed lines highlighted on the image are visual aids to help judge your speed and the direction you are flying. You can enable them in the Settings. They appear when your speed is above 100m/s
Flight Controls
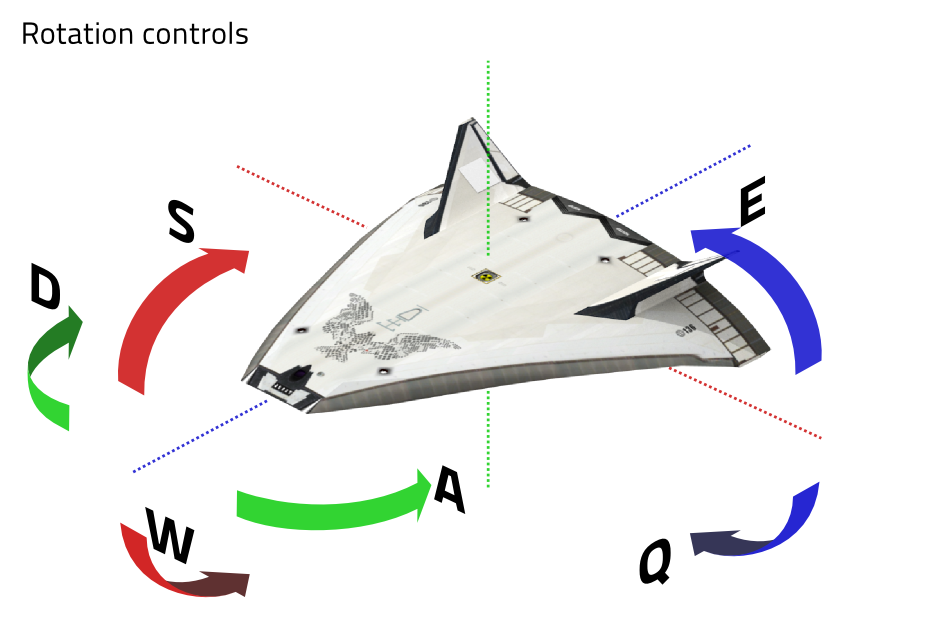
Rotation controls
First let's try facing the station we left a few minutes ago. It should be right behind the ship.
- You can rotate your ship using
- [J] and [L] keys for yaw (horizontal rotation)
- [I] and [K] for pitch (vertical)
- [Q/U] and [E/P] for roll (longitudinal or bank).
- [R] toggles rotation damping. If it's off, then the ship won't stop rotating automatically, and you have to counter the rotation by hand.
- You can also point your ship using the mouse, by holding down the [Right Mouse Button] which will then allow you to move the direction of your vessel as easily as you would look around in a first person shooter, via a round, yellow cursor made up of two circles that moves as your mouse moves and tells your ship which way to point.
Try facing the space station, and then try to find and face Barnard's star and another station called High Security Prison Serenity. If you don't see any labels, you might pressed [TAB] accidentally. You cycle trough different display modes with it, so pressing it again first hides the dashboard, then brings it and the labels back. You can set any labeled object as Navigation target by clicking on it with your [Left Mouse Button]. Clicking on it again will de-select it.
If you switch to an external view with [F1] and zoom in with [Mouse wheel] or [+],[-] you can see how your maneuvering thrusters fire briefly when you are rotating your ship. You can manipulate the view with the NumPad.
Autopilot
Before you do any flying around, it's useful to mention how the autopilot can be used, so if you drift away, you can get back to the station easily. You need to have an Autopilot equipment installed to be able to use it. The ship you get at any starting point already has it, but you need to install it yourself when you buy a new vessel. You can bring up the Autopilot interface by clicking right mouse on any body or ship either in space, in the System overview window, or their label on the reticule.
For stations, you will have several options:
- 1: Request Docking clearance: You need to request this if you want to land or dock to a spaceport or orbital station. It expires after about 5 minutes, so don't fool around too much.
- 2: Autopilot: Dock with the space station: Instruct your autopilot to land/dock on the navigation target. It will approach it first if it's far away. It requests clearance automatically.
- 3: Autopilot: Fly to the vicinity of <nav target>: Instructs the autopilot to fly close to the navigation target and stop. You can use this to get back if you fly too far.
For bodies you can either instruct the autopilot to approach, or enter into an orbit around it.
You can turn off the autopilot by switching flight mode. It switches to Set Speed mode on it's own if it finished it's task.
Set Speed mode
You can cycle flight modes with [F5]. Choose Set Speed if you don't have that selected already. Set speed mode can be quite useful, since it's trying to maintain the speed you set in the direction the ship is facing, using the vessel's maneuvering thrusters. This is the closest you can get to the throttle control you can find in most flight and space games. Make sure you have the station targeted, so we always know, how far it is from us, and to which direction.
Before doing anything, let's turn away from the station, but keep it on either side of the view, so you can more easily feel our speed while you are flying around.
In Set speed mode you can increase the desired speed with [Enter/T] and decrease it with [Right Shift/G]. It will stop changing the value when you reach zero, and you need to press and hold it again to set it past zero. Do not increase it above 150m/s now, so we don't get too far from the station (which can cause a certain problem we will talk about soon). You can go backwards if you set it to a negative value. The speed is always relative to your reference object, which should be the station right now. The reference object is always displayed above the scanner, next to the speed display.
You will notice that as soon as you start your engines, a rhombus (or diamond) icon appears, and it chases the crosshair if you turn your ship. It shows the direction you are moving, and it's called the Prograde marker. If you have a navigation target selected, it will become green and also shows your speed relative to it. And if you are not in the Reference frame of the target, the green one might not align with the white Prograde marker, but I will elaborate on that later.
Above 100 m/s, some lines will start to appear to visualize the direction and speed of the ship (if you have them enabled. See above). They are not space dust, but generated by the flight computer to help you orient your ship.
Fly around for a while so you can get the hang of the controls. Check the other side of the station, but try not to hit it, you can easily blow yourself up.
You will note that the Prograde marker needs a bit of time to get back to the crosshair. It's because the maneuvering thrusters of the vessel are fighting with the momentum of your ship. The weaker they are, or the heavier the ship, the more they need to work in order to maintain your direction. And thruster power might not be the same for each direction, so you could easily need quite more time to slow down with your retro thrusters compared to your main engine for example.
Let's see them in action! Press [F1] to switch to external view, and try to rotate the ship. You will see the maneuvering thrusters firing when you alter your course. You will notice that your main engines stop firing when you reach the speed you set, but they come alive for a while again if you turn a bit. That's right, you don't need to constantly apply thrust in the vacuum of space to maintain any given speed, since there's no medium to slow the ship down.
Lateral movement
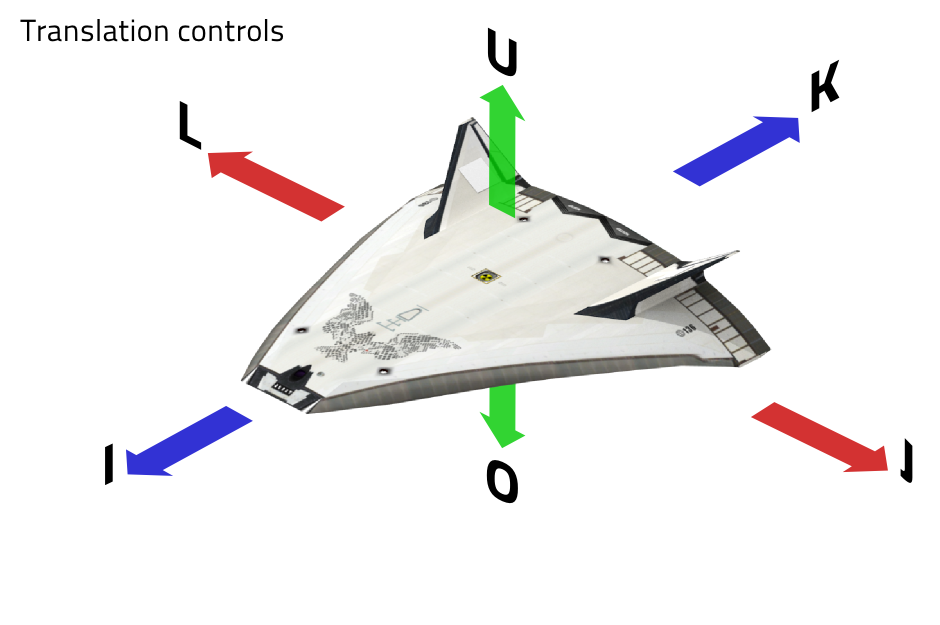
Those maneuvering thrusters can be used for lateral movement too (or translation control if you like), which is quite useful for precise course corrections or even combat. Go back to internal view with [F1] and get back to about 2-3 km close to the station and stop.
There are thrusters on your ship for each direction:
- [W],[S] for forward and backward
- [A],[D] for horizontal movement
- [R],[F] for vertical.
Try out each of them while facing towards the station, so you can see your movement. Finish your flight around the station if you haven't already.
These controls are overriding your Set Speed mode while you are holding them, so be careful, and again: don't hit the station. This overriding nature is especially dangerous close to the surface of a planet since it switches off the bottom thrusters, which are keeping you in the air)
Manual flight
Now let's turn of that dusty old flight computer and fly this craft all by yourself and learn a bit about the physics of spaceflight while we are at it. So press [F5] and switch to Manual control. This will turn off the flight aid that tried to maintain the speed in the direction we were facing. All controls are the same except for the two speed control.
Now if we fire any thruster, the ship will start to move in the opposite direction of the thrust like it did before, but it won't stop and now we are drifting. We can even turn while we are drifting and we will keep traveling in the same direction. This phenomenon is called conservation of momentum. To put it simply, if you put in some energy to move your ship, then you need to put in the same amount of energy in the opposite direction if you want to stop. Since we are in space, there's no atmosphere to slow us down, so we have to provide that energy ourselves, with our thrusters and propellant. Let's try flying a circle around the station again. Keep an eye on your speed, don't accelerate too much or you will fly away from the station, or hit it.
Frame of reference
Well, maybe if you circled the station enough, let's just fly away then. Get about 25km away from the station in any direction. You will notice that when your distance exceeds 20km, the Relative to: and Speed indicator change and now it says about 6,7km/sec relative to System and the speed lines and Prograde marker are pointing to another direction. Don't remember accelerating that much? You are basically right. The thing is, in the vacuum of space, you don't have any convenient point of reference to measure your speed against, like on the surface of a planet. And speed only makes sense relative to something, and this is the Frame of reference. Your flight computer picks Reference frame for you and it was the station until you left it's sphere of influence, which is about 20km for this one. Then it picked the object the station was orbiting, which is the star of the system. And to orbit the star, you need to move about 6,7km/s perpendicular to it's surface, to keep falling indefinitely (aka orbiting). Your speed relative to the station is the same as when you left it's reference frame, you just aren't measuring your speed to it anymore. If you target the station with the [Left Mouse Button] while holding down [CTRL], it will show you the speed relative to it. You can set your frame of reference to any orbital body or ship this way. This will affect your Set Speed flight mode, but not the speed,lines.
Prograde marker
The prograde marker is a quite useful tool with some additional tricks to it. It shows the direction you are moving, and if you have a navigation target, it will show which direction you are traveling to relative to it, not to mention your speed towards it. (Green marker)
One simple trick to it is that when you are accelerating, the Prograde marker will move towards your crosshair. Or you can imagine it like you are pulling it. Decelerating is the opposite, you push the marker away from the crosshair (or pulling it towards the other side, since you are practically accelerating to that direction). This little trick makes course fine-tuning a bit easier.
Docking
You should start getting the hang of this by now, so let's try a more complex task: Dock back to the High Security Prison Tranquility flying manually. Select the station if you don't have it already. Turn towards it, and try to set your vector (Prograde marker) towards the station. You might need to use your lateral thrusters. Don't fly too fast to avoid overshooting. This means you shouldn't accelerate all the way. If you are not too far from the station, 200 to 500 m/s should be enough.
When you returned to the station's frame of reference, play around with your speed to get the hang of what's your retro thrusters are capable of. Those are always weaker then the main thrusters of a vessel, so deceleration will take more time with them. You can also turn around and use your main thrusters for deceleration. This is the preferred method for in-system flight anyway. If you are flying at 500m/s and start to decelerate as soon as you enter the frame of the station, you should be good. Try to stay under 200m/s when you are getting closer to the station.
Don't forget to ask for docking clearance ([F4]). If it's granted your nav target marker will be in front of the station. Align yourself with the dock of the station and lower your speed as you are getting closer, and aim for the nav marker. It's useful to fly in front of the station first if you are coming in from the side or from behind to give yourself some room for maneuvering. 40 m/s is a reasonable speed closer to the station, gives you plenty of time to react if something's not right.
When you reach the nav marker, the station will take over and tows your ship into the dock automatically.


