How to fly without autopilot
Fed up with the autopilot wasting propellant? Want to take things into your hand? Look no more!
This tutorial will guide you through flying your ship manually to your destination. Even better, in a more economical manner than that pesky autopilot.
Contents
Things to know
First, there are some important information you need to keep in mind:
- Newton's laws of motion: What you accelerate you need to decelerate. No medium in space that will slow you down. And it will take you about the same amount of time and propellant to do it, so take care.
- Same goes for steering: you need to use your engines to alter your trajectory.
- DeltaV: Measuerd in km/s. Consider it as your "fuel" reserves. It's the capacity of your ship to change it's speed using the propellant in the tanks. If you are flying faster then your deltaV reserve, then you won't ever be able to stop.
- The tighter the orbit, the faster the body moves. Good to know when you want to fly to a planet circling close around it's parent sun, and pushes the autopilot into a propellant wasting wiggle frenzy. (Once I had to do a SAR mission with only 7% propellant, including the return trip because of the autopilot)
Phases of a transfer
You arrived into your system of choice, and now you just need to fly to a starport to fulfill your delivery. Or you want to travel from a moon to another around a gas giant. The way you do it is pretty much the same, with some minor but significant differences. It's called a brachistocrone transfer.
First, pick your navigation target, either from the F4 menu or from the map. If your target goes around fast as you increase time acceleration, then you are better off targeting it's parent first, and adjust your trajectory when you are close.
The trip itself will consist of three phases:
Acceleration
First, you need to accelerate towards your target. You need to align the yellow prograde marker (diamond) with your destination. But you should use only your main thrusters, rotating your ship perpendicular to your trajectory if needed. The reason for this that the other thrusters are way less efficient, and can eat trough your propellant reserves in no time.
You need to pay attention to two things during acceleration:
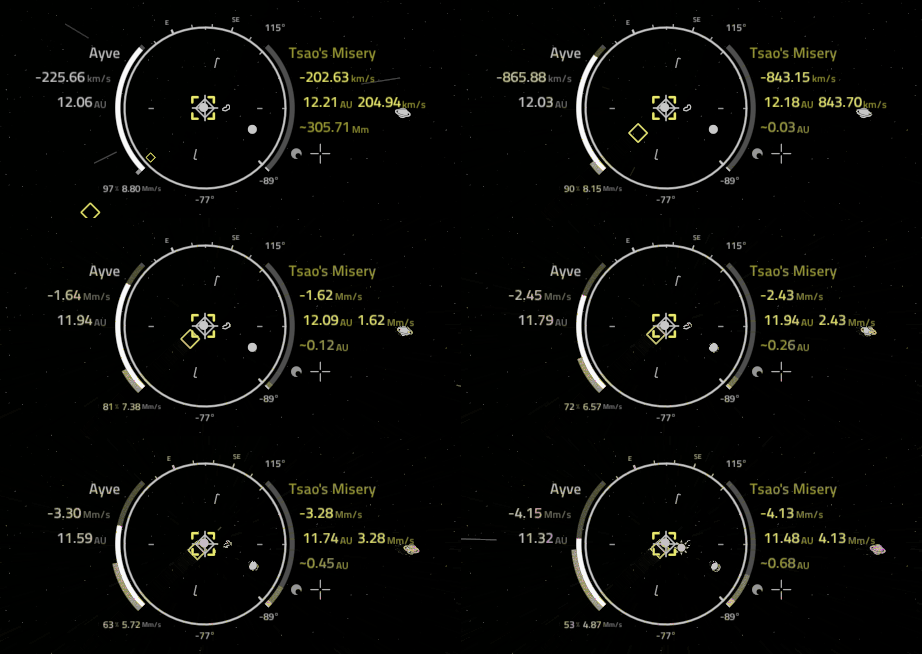
- The three bars on the sides of the reticule. The left side is your deltaV gauge. As you can see on this animation, the white bar is slowly depleting as the ship accelerates towards the target. This is your deltaV reserve. The gray bar filling up next to it is your current speed compared to your deltaV reserves. Note that I didn't let if grow over the white bar, even kept it a little bit bellow. If it goes over your reserves, then you will not have enough propellant to slow down. Ever. I'm keeping it a bit smaller too, just so save up some propellant for course corrections.
- The bar on the right side of the reticule shows the distance needed to stop, compared to the actual distance to your target. For longer travels it's not too important yet, but for shorter trips, it's important to keep an eye on it. (See below)
At this leg of the trip, it's useful to be careful with time acceleration, because it's quite easy to over-accelerate. 1000x is usually enough. Even less for shorter trips.
Coasting
Depending on the distance to your destination and the capabilities of your ship, this part of the transfer can easily take the most time. You cut your engines and fly towards your target at several thousand km/s'.
Now is the time to adjust your trajectory, so you fly by your destination as close as possible. But do this on 1x time acceleration, so you have plenty of time to plan the corrections, and won't overshoot your target accidentally.
For this you can use the Orbital map:
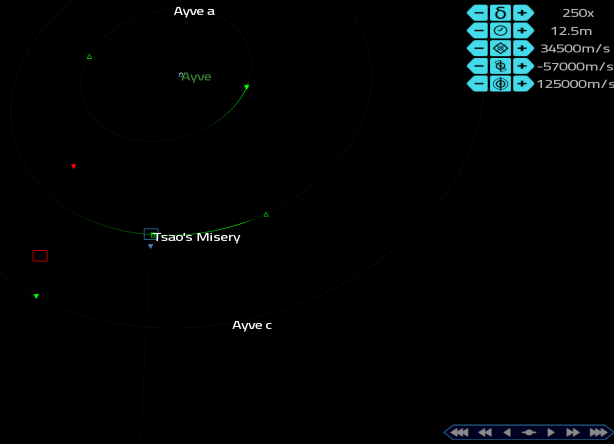
Find your destination. First adjust the time with the controls at the bottom right, until you find the time of your closes approach. Which was quite off in my case. Then you can use the top right controls to adjust your trajectory as close as possible to your target.
- First one is the multiplier to the controls.
- The second is the time of maneuver. It should be a couple of minutes or so, to give you some time to find the trajectory.
- Third is prograde and retrograde (your direction of flight. You will use this the least in this case usually.
- Fourth is normal and antinormal. You can rotate your orbit with them in most cases.
- Fifth is radial in and out.
By using these, you set up a maneuver. It's direction, ETA, deltaV and burn time will be shown on the flight UI. You just need to accelerate towards this vector at the ETA for the given time to adjust your orbit. When finished, push trought he buttons to reset them.
Important to note, that this method will not work on some cases, because it wasn't intended for this kind of planning, and these directions aren't always sufficient. Alternatively you can eyeball it, rotate your craft and start firing your thrusters. While doing that you can open the orbital map, and your engines will not stop firing, and you ca
n watch the change in your trajectory. If good, then go back to the flight UI when the path is aligned. If not, then go back immedietelly adjust your orientation and try again. This method is quite finicky, but by looking at the relative alignment of the planets can help picking the right angle. (I had to use this method in the case of that image actually)
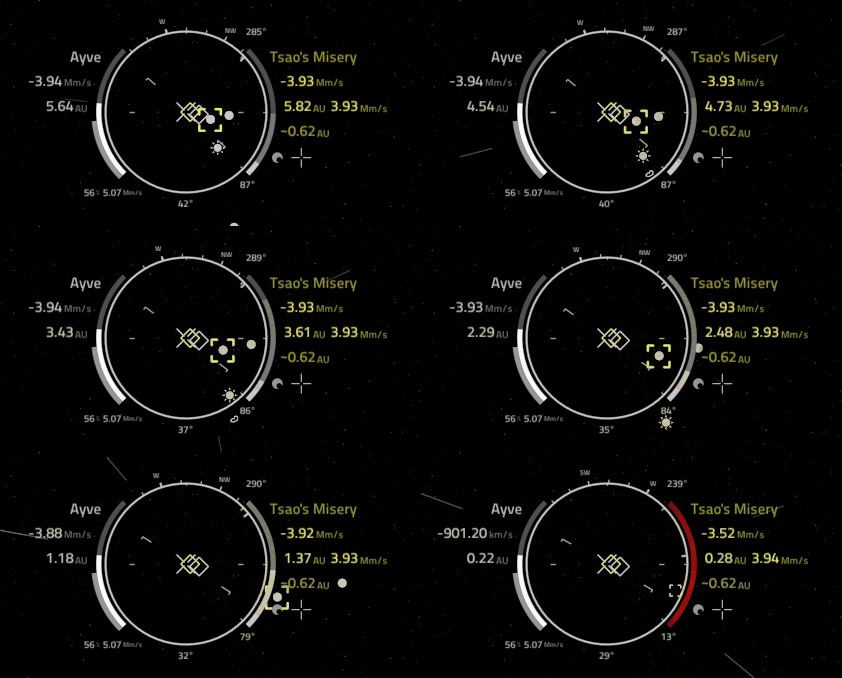
Now you need to watch your stop distance gauge, which is on the right side of the reticule: As you get closer to your target, the white bar will fill up and turn green. This bar shows the distance you need to cover to come to a stop, compared to your current distance. The fainter gray one is the same for your retro thrusters. You need to start decelerating as it's turning to green,and before the red bar crawls over from the top if you don't want to overshoot your target. (As seen in the animation te the left)
Deceleration
This phase usually takes as much time and distance as the acceleration phase. You will need to turn around and use your main thrusters for deceleration (and switch to rear view). You could use your retro thrusters too, but then you will need to start decelerating sooner, resulting in a longer trip. And it's less efficient too, your propellant might not even be enough for it if you didn't keep enough in reserve.
Notice that the white bar can deplete a bit, since it's only an approximation that gets more accurate as you slow down. This is why it's useful to cut the engines a bit at times and let it fill up again, to avoid stopping too soon.
This is also the time for the final course adjustments. Switching to rear view makes it a lot easier. The prograde vector can stray quite a bit from the target as you get closer and the target goes along it's orbit. But as seen on the animation, it can be pushed towards the target if Ithe ship is turned away. The more It's turned away the more it will push it. It's a useful thing to keep in mind in general: accelerating "pulls" in the prograde towards the crosshair, decelerating pushes it away.
Short trips
Shorter transfers might have no coasting phase at all. It's important to note this, because then you need to pay attention both to your deltaV reserves and stop distance gauge at the same time. It's advisable to do these trips on a lower level of time acceleration, and fall back to 1x before turning around, to avoid overshots and using to much propellant.
Closing notes
Hopefully this short explanation will give you enough courage to try flying without autopilot and see the universe on your terms. Don't forget that practice makes the master, so don't get discouraged if your first (few) try is not successfull. Counter-intuitively larger distances can be better learning opportunities, because there's a larger margin of error, and you don't need to pay attention to two or three things at one.
And it's a quite rewarding moment when you can see your destination station growing larger as you fly closer to it. Even better if it's a downed ship you are helping out during a SAR mission.


